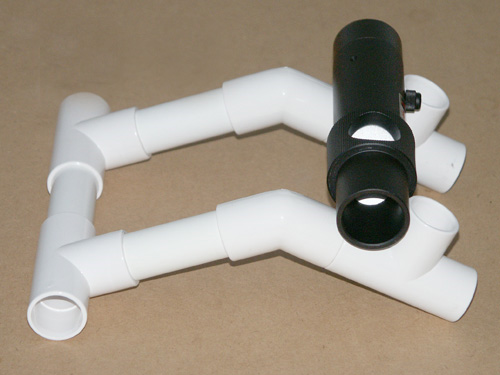
I thoroughly recommend that you make
something similar out of plastic or wood as all that is required is a suitable
‘V’ block to rest the collimator body in so that it can be smoothly rotated
through 360 degrees – I have even seen one made out of Lego bricks and why not! To
check the calibration, the laser should be rested in the jig aimed at a wall about 6
metres (20 ft) away and slowly rotated. If the laser dot on the wall describes a circle as
the collimator is rotated then the collimator is out of calibration. If your particular
laser collimator is designed for user collimation, there will be three adjustable screws
around the circumference of the body of the unit and by loosening one and tightening
another, it will be seen that the laser dot will move slightly. Only minute adjustments
should be made and the screws should not be over-tightened or made too loose. What you are
aiming for is a full rotation of the collimator in the jig resulting in NO movement of the
laser dot on the far wall.
Once you have achieved this stationary
laser dot, the instrument will be collimated and ready to be put to use. Please note that
many of these units rely on the screwing in of a small bolt on the side of the instrument
to turn the laser on and it is important to screw this bolt in just enough to turn the
laser on and no more to ensure that no distortion of the internal printed circuit board
takes place as this could cause an offset of the laser beam.
The second important point with a laser
collimator is that it must seat tightly and accurately in the eyepiece holder before the
retaining screw(s) are tightened – this is to ensure that the collimator is position
in the centre of the eyepiece holder in a repeatable manner. It may be necessary to shim
the body of the collimator with electrician’s tape to ensure that this happens.
Alternatively, a company called Hotech (http://www.hotechusa.com/prod-sprt.html) manufacture a suitable laser
collimator that has an expanding body to form a repeatable and accurate centring of the
device in the eyepiece holder. Kendrick Astro Instruments (http://www.kendrickastro.com/astro/laser.html)
make a range of laser collimators including one specifically for collimating an SCT.
Laser
Collimating an SCT
Schmidt Cassegrain Telescopes (SCTs) suffer
from various errors including optical and mechanical alignment issues. Optical errors in
SCTs often manifest themselves in incorrect centring of the secondary mirror. This means
that even in a correctly collimated and star tested SCT, the return path of a laser
installed in the eyepiece holder will not be dead centred and the typical five times
magnification imparted by the convex secondary mirror only serves to worsen the problem.
It is not unusual for a properly collimated SCT to display a return path between 3.0 and
6.0mm off centre! A laser collimator, therefore, cannot be used in the same manner as with
a Newtonian Reflector. However, by using a special two part process, it is possible to use
a laser to collimate a (SCT).
The first part of the process calibrates
the laser collimator for your individual SCT. This procedure only has to be carried out
once and the calibrated collimator can then be used in the future with the same telescope
only.
There are two possible scenarios for this
calibration process:-
an SCT that is known to be well collimated as confirmed
by a star test
an SCT that is known to be out of calibration
An already
correctly collimated SCT
If you know that your SCT is correctly
collimated and have carried out a star test to confirm this then the calibration process
is quick and simple.
Insert the collimator in the eyepiece
holder and tighten the retaining screws (or in the case of the Hotech device mentioned
above, tighten the expanding retaining ring). Mark both the body of the collimator and the
eyepiece holder in such a manner that you can accurately replace the collimator in the
eyepiece holder at any time in the future.
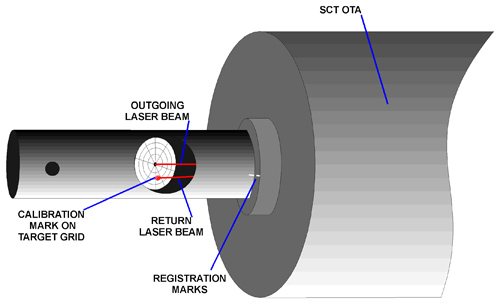
Now, turn on the laser and carefully mark
the centre of the return beam on the collimator’s built in target grid. The laser
collimator is now calibrated for this one telescope. See Fig 2.
In future, insert the collimator in the
eyepiece holder being careful to align the two marks made earlier and check that the
return beam falls on the mark on the target grid. If it doesn’t, adjust the secondary
mirror in accordance with the manufacturer’s instructions until it does – your
SCT will now be collimated to the original accuracy used to perform the calibration.
An incorrectly
collimated SCT
If you know that your SCT is incorrectly
collimated and only wish to collimate using your laser collimator then the calibration
process is somewhat more complex but again, only has to be carried out once.
Insert the collimator in the eyepiece holder and tighten
the retaining screws (or in the case of the Hotech device mentioned above, tighten the
expanding retaining ring). Mark both the body of the collimator and the eyepiece holder in
such a manner that you can accurately replace the collimator in the eyepiece holder at any
time in the future.
Now, turn on the laser and carefully adjust the secondary
mirror in accordance with the manufacturer’s instructions until the return beam falls
on the target grid as close to the laser beam’s exit hole as possible.
Place a paper target (downloadable from here) at a distance a little
further away than the closest focus point of your telescope.
Remove the laser collimator and replace it with an
eyepiece (cross hair type if possible). Using your RA and DEC fine controls, adjust the
telescope until the eyepiece’s crosshair is centred on the target or until the
circles on the target are concentric with the view through the eyepiece.
Carefully remove the eyepiece and replace it with the
laser collimator being careful to align the two marks made earlier and adjust the focus
slowly to produce as sharp a dot on the target as possible - you will need the assistance
of a trusted friend or a good spotting ‘scope/binoculars to see the laser dot. The
position of this dot represents the precise optical path that your telescope is currently
collimated to.
Note the position of the red dot and then carefully
adjust the secondary mirror in accordance with the manufacturer’s instructions until
you have moved the dot closer to the centre of the paper target by no more than 30% of any
error shown – do not try to completely eradicate the error.
Once again, carefully remove the laser collimator and
replace it with the eyepiece. You will note that the crosshair/concentric target rings are
no longer centred. Carefully adjust the RA and DEC controls of your mount to move the
eyepiece view towards the centre of the paper target by no more than 30% of any error
shown – do not try to completely eradicate the error.
Carefully remove the eyepiece and replace it with the
laser collimator being careful to align the two marks made earlier and re-focus the red
dot on the paper target. Repeat from section 6. onwards until the red dot is as close to
the centre of the target as possible but remember that it is unlikely that you will end up
with the red dot exactly in the centre of the target – this is quite normal.
Your telescope is now collimated. When you
have finished this collimation process, carefully mark the centre of the return beam on
the collimator’s built in target grid. The laser collimator is now calibrated for
this one telescope.
In future, insert the collimator in the
eyepiece holder being careful to align the two marks made earlier and check that the
return beam falls on the mark on the target grid. If it doesn’t, adjust the secondary
mirror in accordance with the manufacturer’s instructions until it does – your
SCT will now be collimated to the original accuracy used to perform the calibration.